Yarn cluster 模式运行机制源码分析
启动下面的代码:
bin/spark-submit \
--class org.apache.spark.examples.SparkPi \
--master yarn \
--deploy-mode cluster \
./examples/jars/spark-examples_2.11-2.1.1.jar \
100
yarn 会按照下面的顺序依次启动了 3 个进程:
SparkSubmit
ApplicationMaster
CoarseGrainedExecutorB ackend
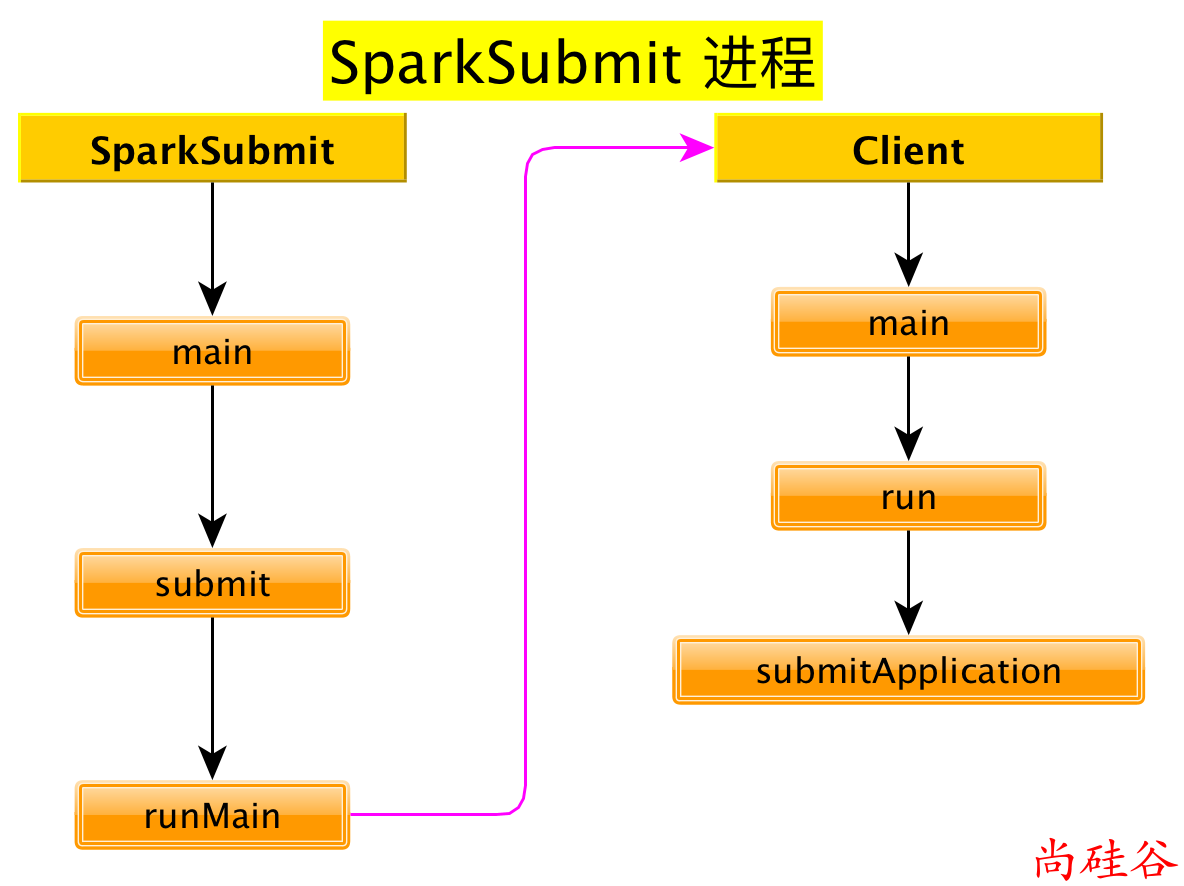
1. bin/spark-submit 启动脚本分析
启动类org.apache.spark.deploy.SparkSubmit
exec "${SPARK_HOME}"/bin/spark-class org.apache.spark.deploy.SparkSubmit "$@"
/bin/spark-class
exec "${CMD[@]}"
最终启动类:
/opt/module/jdk1.8.0_172/bin/java
    -cp /opt/module/spark-yarn/conf/:/opt/module/spark-yarn/jars/*:/opt/module/hadoop-2.7.2/etc/hadoop/
    org.apache.spark.deploy.SparkSubmit
        --master yarn
        --deploy-mode cluster
        --class org.apache.spark.examples.SparkPi
        ./examples/jars/spark-examples_2.11-2.1.1.jar 100
2. org.apache.spark.deploy.SparkSubmit 源码分析
SparkSubmit伴生对象
main方法
def main(args: Array[String]): Unit = {
    /*
        参数
        --master yarn
        --deploy-mode cluster
        --class org.apache.spark.examples.SparkPi
        ./examples/jars/spark-examples_2.11-2.1.1.jar 100
    */
    val appArgs = new SparkSubmitArguments(args)
    appArgs.action match {
            // 如果没有指定 action, 则 action 的默认值是:   action = Option(action).getOrElse(SUBMIT)
        case SparkSubmitAction.SUBMIT => submit(appArgs)
        case SparkSubmitAction.KILL => kill(appArgs)
        case SparkSubmitAction.REQUEST_STATUS => requestStatus(appArgs)
    }
}
submit方法
/**
  * 使用提供的参数提交应用程序
  * 有 2 步:
  * 1. 准备启动环境.
  *    根据集群管理器和部署模式为 child main class 设置正确的 classpath, 系统属性,应用参数
  * 2. 使用启动环境调用 child main class 的 main 方法
  */
@tailrec
private def submit(args: SparkSubmitArguments): Unit = {
    // 准备提交环境  childMainClass = "org.apache.spark.deploy.yarn.Client"
    val (childArgs, childClasspath, sysProps, childMainClass) = prepareSubmitEnvironment(args)

    def doRunMain(): Unit = {
        if (args.proxyUser != null) {

        } else {
            runMain(childArgs, childClasspath, sysProps, childMainClass, args.verbose)
        }
    }
    if (args.isStandaloneCluster && args.useRest) {
        // 在其他任何模式, 仅仅运行准备好的主类
    } else {
        doRunMain()
    }
}
prepareSubmitEnvironment方法
// In yarn-cluster mode, use yarn.Client as a wrapper around the user class
if (isYarnCluster) {
    // 在 yarn 集群模式下, 使用 yarn.Client 来封装一下 user class
    childMainClass = "org.apache.spark.deploy.yarn.Client"
}
doRunMain方法
def doRunMain(): Unit = {
    if (args.proxyUser != null) {

    } else {
        runMain(childArgs, childClasspath, sysProps, childMainClass, args.verbose)
    }
}
runMain方法
/**
  *
  * 使用给定启动环境运行 child class 的 main 方法
  * 注意: 如果使用了cluster deploy mode, 主类并不是用户提供
  */
private def runMain(
                       childArgs: Seq[String],
                       childClasspath: Seq[String],
                       sysProps: Map[String, String],
                       childMainClass: String,
                       verbose: Boolean): Unit = {

    var mainClass: Class[_] = null
    try {
        // 使用反射的方式加载 childMainClass = "org.apache.spark.deploy.yarn.Client"
        mainClass = Utils.classForName(childMainClass)
    } catch {

    }
    // 反射出来 Client 的 main 方法
    val mainMethod = mainClass.getMethod("main", new Array[String](0).getClass)
    if (!Modifier.isStatic(mainMethod.getModifiers)) {
        throw new IllegalStateException("The main method in the given main class must be static")
    }
    try {
        // 调用 main 方法.
        mainMethod.invoke(null, childArgs.toArray)
    } catch {

    }
}
3. org.apache.spark.deploy.yarn.Client 源码分析
main方法
def main(argStrings: Array[String]) {

    // 设置环境变量 SPARK_YARN_MODE 表示运行在 YARN mode
    // 注意: 任何带有 SPARK_ 前缀的环境变量都会分发到所有的进程, 也包括远程进程
    System.setProperty("SPARK_YARN_MODE", "true")
    val sparkConf = new SparkConf
    // 对传递来的参数进一步封装
    val args = new ClientArguments(argStrings)
    new Client(args, sparkConf).run()
}
Client.run方法
def run(): Unit = {
    // 提交应用, 返回应用的 id
    this.appId = submitApplication()
}
client.submitApplication方法
/**
  *
  * 向 ResourceManager 提交运行 ApplicationMaster 的应用程序。
  *
  */
def submitApplication(): ApplicationId = {
    var appId: ApplicationId = null
    try {
        // 初始化 yarn 客户端
        yarnClient.init(yarnConf)
        // 启动 yarn 客户端
        yarnClient.start()

        // 从 RM 创建一个应用程序
        val newApp = yarnClient.createApplication()
        val newAppResponse = newApp.getNewApplicationResponse()
        // 获取到 applicationID
        appId = newAppResponse.getApplicationId()
        reportLauncherState(SparkAppHandle.State.SUBMITTED)
        launcherBackend.setAppId(appId.toString)

        // Set up the appropriate contexts to launch our AM
        // 设置正确的上下文对象来启动 ApplicationMaster
        val containerContext = createContainerLaunchContext(newAppResponse)
        // 创建应用程序提交任务上下文
        val appContext = createApplicationSubmissionContext(newApp, containerContext)

        // 提交应用给 ResourceManager 启动 ApplicationMaster
        // "org.apache.spark.deploy.yarn.ApplicationMaster"
        yarnClient.submitApplication(appContext)
        appId
    } catch {

    }
}
方法:
createContainerLaunchContext
private def createContainerLaunchContext(newAppResponse: GetNewApplicationResponse)
: ContainerLaunchContext = {
    val amClass =
        if (isClusterMode) {  // 如果是 Cluster 模式
            Utils.classForName("org.apache.spark.deploy.yarn.ApplicationMaster").getName
        } else { // 如果是 Client 模式
            Utils.classForName("org.apache.spark.deploy.yarn.ExecutorLauncher").getName
        }
    amContainer
}
至此, SparkSubmit 进程启动完毕.
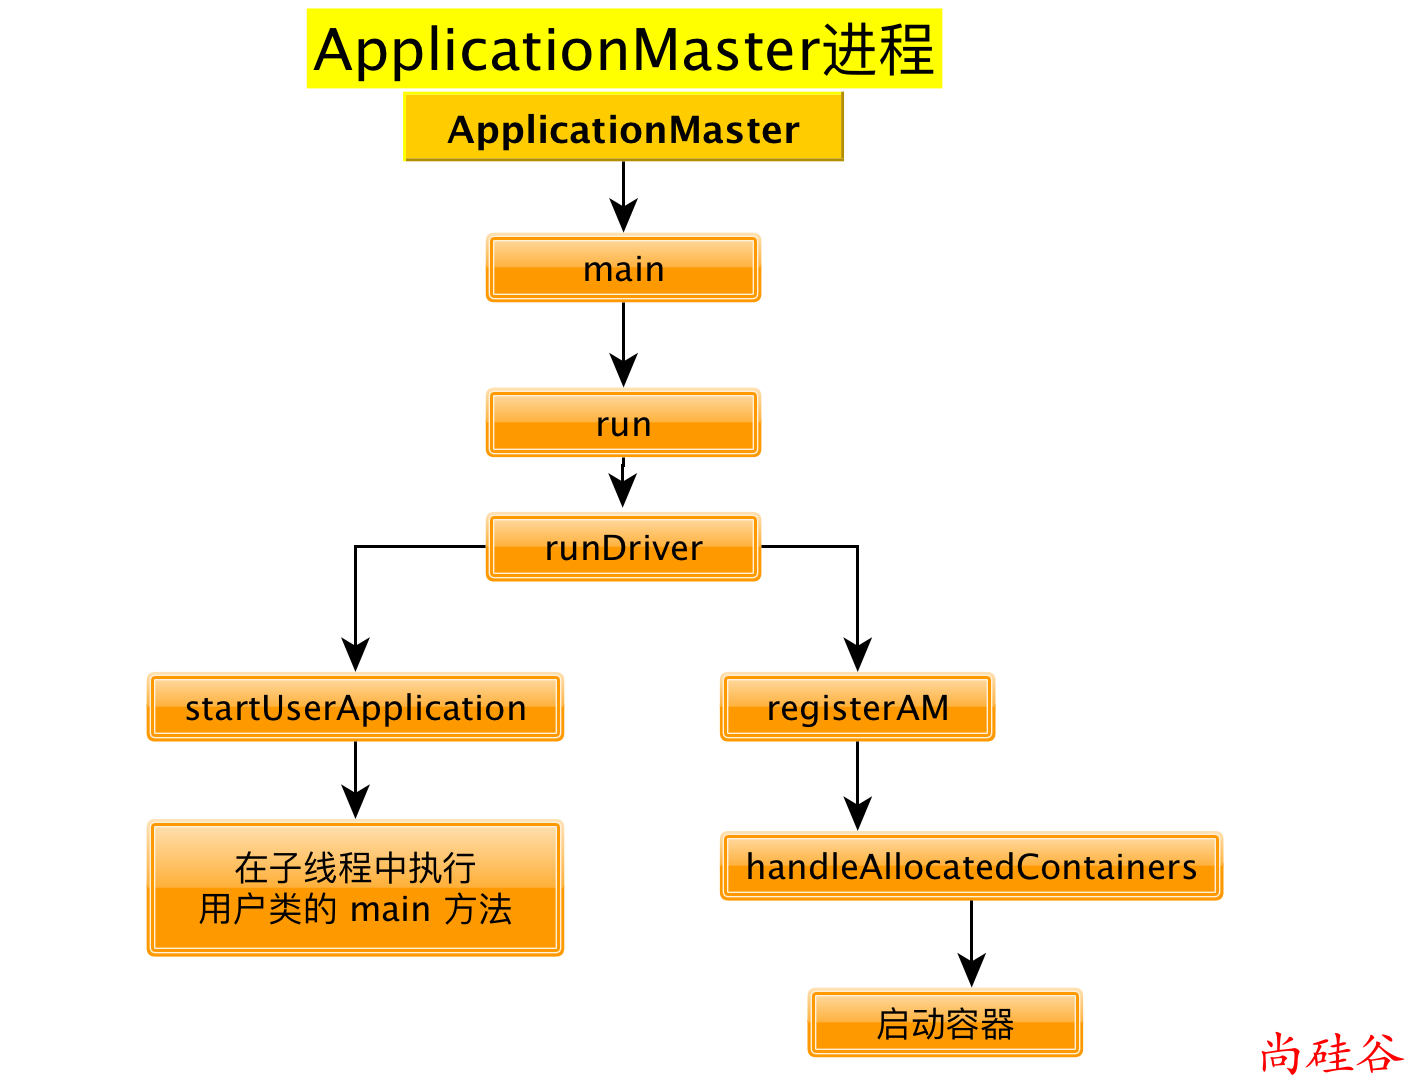
4. org.apache.spark.deploy.yarn.ApplicationMaster 源码分析
ApplicationMaster伴生对象的main方法
def main(args: Array[String]): Unit = {
    SignalUtils.registerLogger(log)
    // 构建 ApplicationMasterArguments 对象, 对传来的参数做封装
    val amArgs: ApplicationMasterArguments = new ApplicationMasterArguments(args)

    SparkHadoopUtil.get.runAsSparkUser { () =>
        // 构建 ApplicationMaster 实例  ApplicationMaster 需要与 RM通讯
        master = new ApplicationMaster(amArgs, new YarnRMClient)
        // 运行 ApplicationMaster 的 run 方法, run 方法结束之后, 结束 ApplicationMaster 进程
        System.exit(master.run())
    }
}
ApplicationMaster伴生类的run方法
final def run(): Int = {
    // 关键核心代码
    try {

        val fs = FileSystem.get(yarnConf)

        if (isClusterMode) {
            runDriver(securityMgr)
        } else {
            runExecutorLauncher(securityMgr)
        }
    } catch {

    }
    exitCode
}
runDriver方法
private def runDriver(securityMgr: SecurityManager): Unit = {
    addAmIpFilter()
    // 开始执行用户类. 启动一个子线程来执行用户类的 main 方法.  返回值就是运行用户类的子线程.
    // 线程名就叫 "Driver"
    userClassThread = startUserApplication()

    val totalWaitTime = sparkConf.get(AM_MAX_WAIT_TIME)
    try {
        // 注册 ApplicationMaster , 其实就是请求资源
        registerAM(sc.getConf, rpcEnv, driverRef, sc.ui.map(_.appUIAddress).getOrElse(""),
                    securityMgr)
        // 线程 join: 把userClassThread线程执行完毕之后再继续执行当前线程.
        userClassThread.join()
    } catch {

    }
}
startUserApplication方法
private def startUserApplication(): Thread = {
    // 得到用户类的 main 方法
    val mainMethod = userClassLoader.loadClass(args.userClass)
        .getMethod("main", classOf[Array[String]])
    // 创建及线程
    val userThread = new Thread {
        override def run() {
            try {
                // 调用用户类的主函数
                mainMethod.invoke(null, userArgs.toArray)
            } catch {

            } finally {

            }
        }
    }
    userThread.setContextClassLoader(userClassLoader)
    userThread.setName("Driver")
    userThread.start()
    userThread
}
registerAM方法
private def registerAM(
                          _sparkConf: SparkConf,
                          _rpcEnv: RpcEnv,
                          driverRef: RpcEndpointRef,
                          uiAddress: String,
                          securityMgr: SecurityManager) = {

    // 向 RM 注册, 得到 YarnAllocator
    allocator = client.register(driverUrl,
        driverRef,
        yarnConf,
        _sparkConf,
        uiAddress,
        historyAddress,
        securityMgr,
        localResources)
    // 请求分配资源
    allocator.allocateResources()
}
allocator.allocateResources()方法
/**
  请求资源,如果 Yarn 满足了我们的所有要求,我们就会得到一些容器(数量: maxExecutors)。

通过在这些容器中启动 Executor 来处理 YARN 授予我们的任何容器。

必须同步,因为在此方法中读取的变量会被其他方法更改。
  */
def allocateResources(): Unit = synchronized {

    if (allocatedContainers.size > 0) {

        handleAllocatedContainers(allocatedContainers.asScala)
    }
}
handleAllocatedContainers方法
/**
  处理 RM 授权给我们的容器
  */
def handleAllocatedContainers(allocatedContainers: Seq[Container]): Unit = {
    val containersToUse = new ArrayBuffer[Container](allocatedContainers.size)
    runAllocatedContainers(containersToUse)
}
runAllocatedContainers方法
/**
  * Launches executors in the allocated containers.
  在已经分配的容器中启动 Executors
  */
private def runAllocatedContainers(containersToUse: ArrayBuffer[Container]): Unit = {
    // 每个容器上启动一个 Executor
    for (container <- containersToUse) {
        if (numExecutorsRunning < targetNumExecutors) {
            if (launchContainers) {
                launcherPool.execute(new Runnable {
                    override def run(): Unit = {
                        try {
                            new ExecutorRunnable(
                                Some(container),
                                conf,
                                sparkConf,
                                driverUrl,
                                executorId,
                                executorHostname,
                                executorMemory,
                                executorCores,
                                appAttemptId.getApplicationId.toString,
                                securityMgr,
                                localResources
                            ).run()  // 启动 executor
                            updateInternalState()
                        } catch {

                        }
                    }
                })
            } else {

            }
        } else {

        }
    }
}
ExecutorRunnable.run方法
def run(): Unit = {
    logDebug("Starting Executor Container")
    // 创建 NodeManager 客户端
    nmClient = NMClient.createNMClient()
    // 初始化 NodeManager 客户端
    nmClient.init(conf)
    // 启动 NodeManager 客户端
    nmClient.start()
    // 启动容器
    startContainer()
}
ExecutorRunnable.startContainer()
def startContainer(): java.util.Map[String, ByteBuffer] = {
    val ctx = Records.newRecord(classOf[ContainerLaunchContext])
        .asInstanceOf[ContainerLaunchContext]
    // 准备要执行的命令
    val commands = prepareCommand()

    ctx.setCommands(commands.asJava)
    // Send the start request to the ContainerManager
    try {
        // 启动容器
        nmClient.startContainer(container.get, ctx)
    } catch {

    }
}
ExecutorRunnable.prepareCommand方法
private def prepareCommand(): List[String] = {

    val commands = prefixEnv ++ Seq(
        YarnSparkHadoopUtil.expandEnvironment(Environment.JAVA_HOME) + "/bin/java",
        "-server") ++
        javaOpts ++
        // 要执行的类
        Seq("org.apache.spark.executor.CoarseGrainedExecutorBackend",
            "--driver-url", masterAddress,
            "--executor-id", executorId,
            "--hostname", hostname,
            "--cores", executorCores.toString,
            "--app-id", appId) ++
        userClassPath ++
        Seq(
            s"1>${ApplicationConstants.LOG_DIR_EXPANSION_VAR}/stdout",
            s"2>${ApplicationConstants.LOG_DIR_EXPANSION_VAR}/stderr")

    commands.map(s => if (s == null) "null" else s).toList
}
至此, ApplicationMaster 进程启动完毕
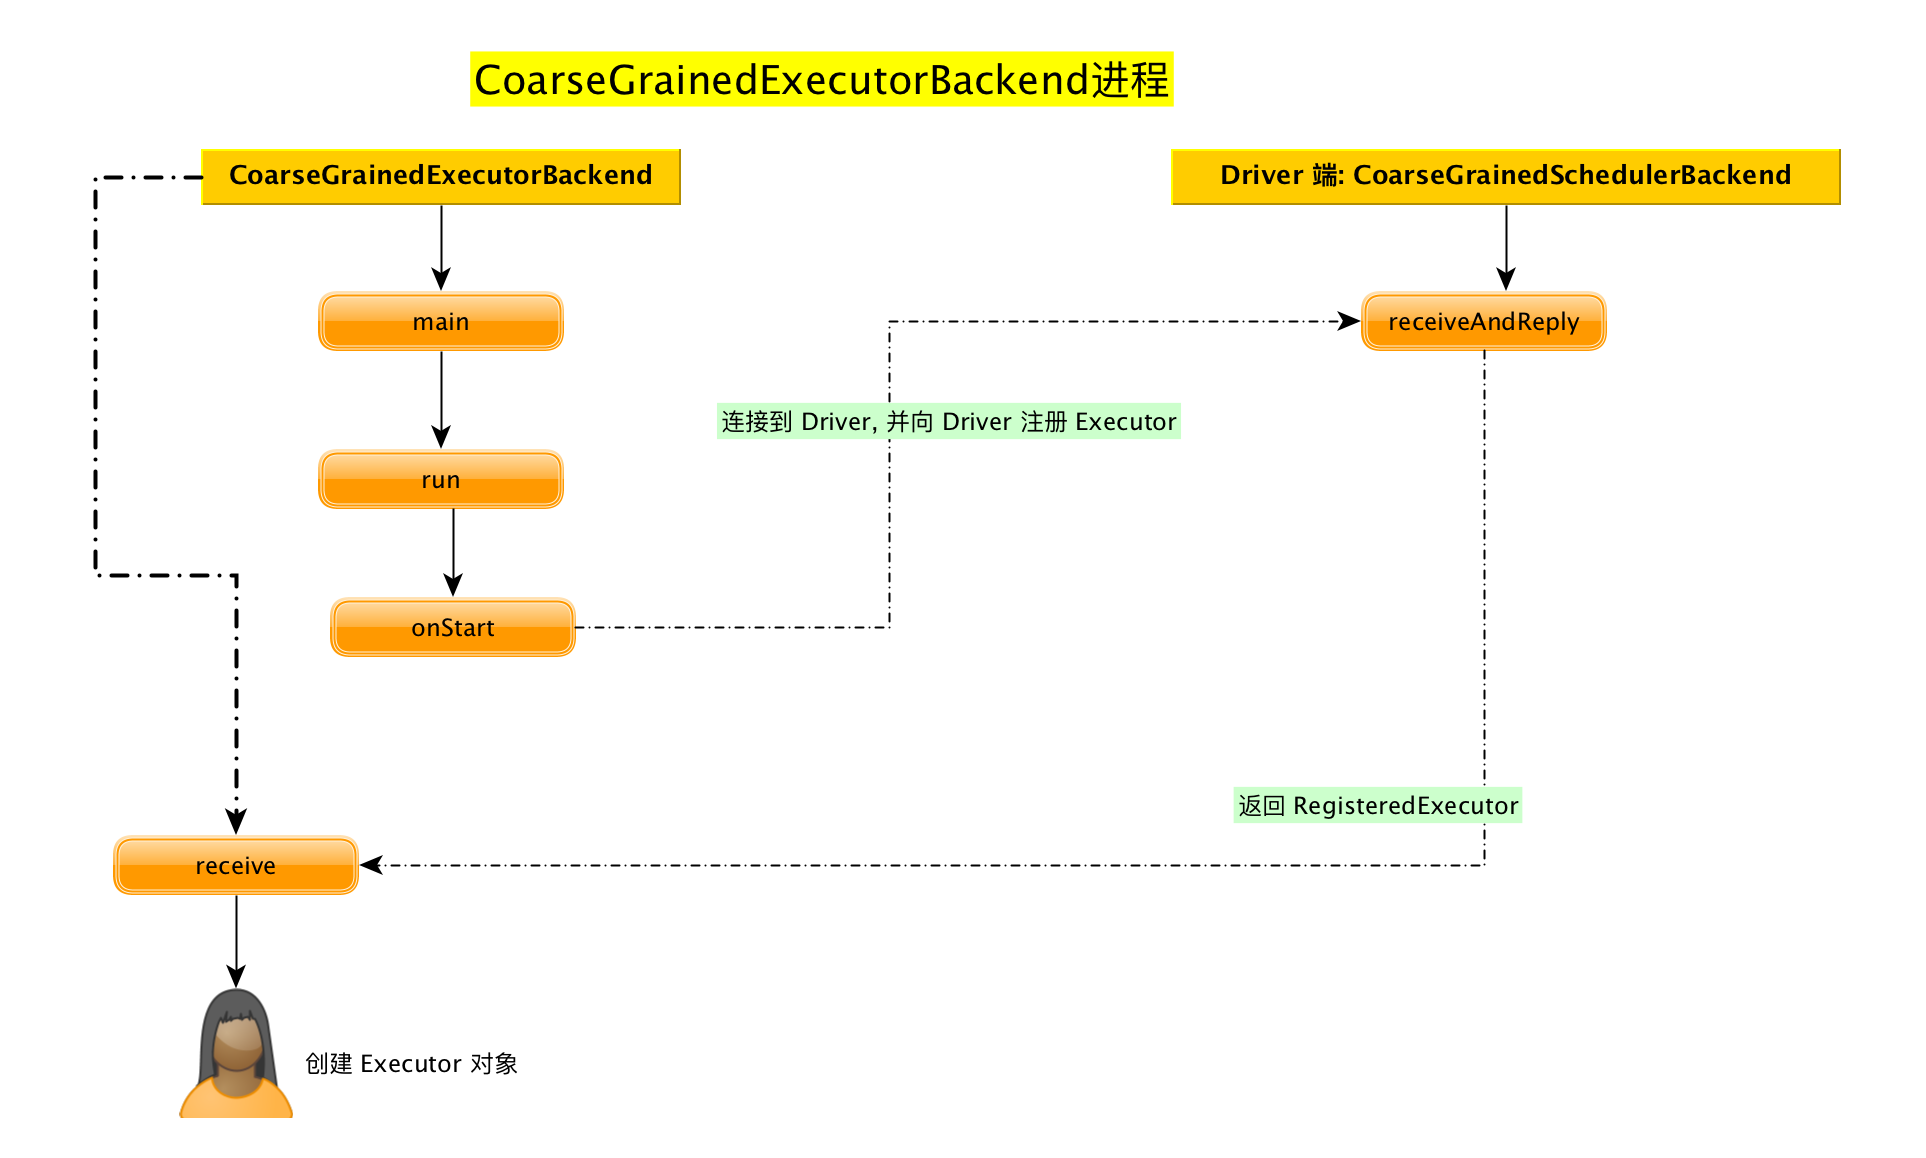
5. org.apache.spark.executor.CoarseGrainedExecutorBackend 源码分析
CoarseGrainedExecutorBackend 伴生对象
main方法
def main(args: Array[String]) {

  // 启动 CoarseGrainedExecutorBackend
  run(driverUrl, executorId, hostname, cores, appId, workerUrl, userClassPath)
  // 运行结束之后退出进程
  System.exit(0)
}
run方法
 /**
    准备 RpcEnv
*/
private def run(
                   driverUrl: String,
                   executorId: String,
                   hostname: String,
                   cores: Int,
                   appId: String,
                   workerUrl: Option[String],
                   userClassPath: Seq[URL]) {

    SparkHadoopUtil.get.runAsSparkUser { () =>
        val env = SparkEnv.createExecutorEnv(
            driverConf, executorId, hostname, port, cores, cfg.ioEncryptionKey, isLocal = false)

        env.rpcEnv.setupEndpoint("Executor", new CoarseGrainedExecutorBackend(
            env.rpcEnv, driverUrl, executorId, hostname, cores, userClassPath, env))
    }
}
CoarseGrainedExecutorBackend 伴生类
继承自: ThreadSafeRpcEndpoint 是一个RpcEndpoint
查看生命周期方法
onStart方法
连接到 Driver, 并向 Driver注册Executor
override def onStart() {
    rpcEnv.asyncSetupEndpointRefByURI(driverUrl).flatMap { ref =>
        // This is a very fast action so we can use "ThreadUtils.sameThread"
        driver = Some(ref)
        // 向驱动注册 Executor 关键方法
        ref.ask[Boolean](RegisterExecutor(executorId, self, hostname, cores, extractLogUrls))
    }(ThreadUtils.sameThread).onComplete {
        case Success(msg) =>
        case Failure(e) =>
            // 注册失败, 退出 executor
            exitExecutor(1, s"Cannot register with driver: $driverUrl", e, notifyDriver = false)
    }(ThreadUtils.sameThread)
}
Driver端的CoarseGrainedSchedulerBackend的receiveAndReply方法
override def receiveAndReply(context: RpcCallContext): PartialFunction[Any, Unit] = {
    // 接收注册 Executor
    case RegisterExecutor(executorId, executorRef, hostname, cores, logUrls) =>
        if (executorDataMap.contains(executorId)) {  // 已经注册过了

        } else {
            // 给 Executor  发送注册成功的信息
            executorRef.send(RegisteredExecutor)

        }
}
Eexcutor端的CoarseGrainedExecutorBackend的receive方法
override def receive: PartialFunction[Any, Unit] = {
    // 向 Driver 注册成功
    case RegisteredExecutor =>
        logInfo("Successfully registered with driver")
        try {
            // 创建 Executor 对象   注意: Executor 其实是一个对象
            executor = new Executor(executorId, hostname, env, userClassPath, isLocal = false)
        } catch {

        }
}
至此, Executor 创建完毕
总结